Server Installation
Prerequisite
Before installing Plant-it, make sure you have the following prerequisites:
dockerversion 3 or abovedocker-compose
Quickstart
Installing Plant-it is pretty straight forward, in order to do so follow these steps:
- Create a folder where you want to place all Plant-it related files.
-
Inside that folder, create a file named
docker-compose.ymlwith this content:name: plant-it services: server: image: msdeluise/plant-it-server:latest env_file: server.env depends_on: - db - cache restart: unless-stopped volumes: - "./upload-dir:/upload-dir" - "./certs:/certificates" ports: - "8080:8080" - "3000:3000" db: image: mysql:8.0 restart: always env_file: server.env volumes: - "./db:/var/lib/mysql" cache: image: redis:7.2.1 restart: always -
Inside that folder, create a file named
server.envwith this content:# # DB # MYSQL_HOST=db MYSQL_PORT=3306 MYSQL_USERNAME=root MYSQL_PSW=root MYSQL_DATABASE=bootdb MYSQL_ROOT_PASSWORD=root # # JWT # JWT_SECRET=putTheSecretHere JWT_EXP=1 # # Server config # USERS_LIMIT=-1 UPLOAD_DIR=/upload-dir API_PORT=8080 FLORACODEX_KEY= LOG_LEVEL=DEBUG ALLOWED_ORIGINS=* # # Cache # CACHE_TTL=86400 CACHE_HOST=cache CACHE_PORT=6379 -
Run the docker compose file (
docker compose -f docker-compose.yml up -d), then the service will be available atlocalhost:3000, while the REST API will be available atlocalhost:8080/api(localhost:8080/api/swagger-ui/index.htmlfor the documentation of them).
Configuration
The server.env file is used to pass configurations to the server. An example of properties and descriptions is the following:
#
# DB
#
MYSQL_HOST=db
MYSQL_PORT=3306
MYSQL_USERNAME=root
MYSQL_PSW=root
MYSQL_DATABASE=bootdb
MYSQL_ROOT_PASSWORD=root

#
# JWT
#
JWT_SECRET=putTheSecretHere
JWT_EXP=1

#
# Server config
#
USERS_LIMIT=-1 # less then 0 means no limit
UPLOAD_DIR=/upload-dir # path to the directory used to store uploaded images, if on docker deployment leave as it is and change the volume binding in the docker-compose file if needed
API_PORT=8080
FLORACODEX_URL=https://api.floracodex.com
FLORACODEX_KEY=
ALLOWED_ORIGINS=* # CORS allowed origins (comma separated list)
LOG_LEVEL=DEBUG # could be: DEBUG, INFO, WARN, ERROR
CONTACT_MAIL=foo@bar.com # address used as "contact" for template email
REMINDER_NOTIFY_CHECK=0 30 7 * * * # 6-values crontab expression to set the check time for reminders
MAX_REQUESTS_PER_MINUTE=100 # rate limiting of the upcoming requests

#
# Notification
#
NTFY_ENABLED=true # if "false" ntfy service won't be available as notification dispatcher
GOTIFY_ENABLED=true # if "false" ntfy service won't be available as notification dispatcher

#
# Cache
#
CACHE_TYPE=redis # Cache type. By default, it's "redis" but can also be "none"
CACHE_TTL=86400
CACHE_HOST=cache
CACHE_PORT=6379
CACHE_PASSWORD=
CACHE_USERNAME=

#
# SMTP
#
SMTP_HOST=
SMTP_PORT=
SMTP_EMAIL=
SMTP_PASSWORD=
SMTP_AUTH=
SMTP_START_TTL=
Integration with Trefle Service [NOT WORKING ANYMORE]
Trefle Service Inactivity
The Trefle service, which Plant-it relied on for plant data, appears to be inactive. There have been no updates to their database, and their repository shows no recent activity, with several open issues dating back years. While the dataset was accessible until recently, it is no longer available.
I am currently exploring the best way to move forward and working on a replacement for this service, as mentioned in issue #218.
As a temporary solution, the Flora Codex service has replaced the Trefle service. However, it lacks some features such as:
• Plant care information • Synonyms
Additionally, it has fewer plants compared to Trefle.
This is a temporary patch that will be resolved in the near future.
Integration with FloraCodex
To enhance your application with plant search capabilities, you can integrate with the FloraCodex service. FloraCodex provides a comprehensive API for searching and retrieving plant information. Follow the steps below to configure and use the FloraCodex service in your project:
-
Create an Account on FloraCodex:
- Visit the FloraCodex website and sign up for an account.
- Follow the registration process to verify your account.
-
Retrieve the API Key:
- Once your account is set up, log in to your FloraCodex account.
- Navigate to the API section to generate or retrieve your API key. This key is necessary for authenticating your requests to the FloraCodex API.
-
Configure the API Key:
- Open the
server.envfile in your project. - Add the following line to the file, replacing
YOUR_FLORACODEX_API_KEYwith the actual API key you obtained from FloraCodex:FLORACODEX_KEY=YOUR_FLORACODEX_API_KEY
- Open the
-
Save and Restart Your Server:
- Save the changes made to the
server.envfile. - Restart your server to apply the new configuration.
- Save the changes made to the
By following these steps, you enable your application to use the FloraCodex service for searching and retrieving information about existing plants. Ensure that your API key is kept secure and not exposed publicly to avoid unauthorized access.
Deployment Without Cache
If you need to deploy the application without using a cache, you can disable the cache by setting the CACHE_TYPE environment variable to none. This prevents the application from attempting to connect to a cache service.
Then, to remove the cache service from your deployment, update your docker-compose.yaml file as follows:
name: plant-it
services:
  server:
    image: msdeluise/plant-it-server:latest
    env_file: server.env
    depends_on:
      - db
    restart: unless-stopped
    volumes:
      - "./upload-dir:/upload-dir"
      - "./certs:/certificates"
    ports:
      - "8080:8080"
      - "3000:3000"

  db:
    image: mysql:8.0
    restart: always
    env_file: server.env
    volumes:
      - "./db:/var/lib/mysql"
Deployment Without Docker
If you prefer to install and run the server without using Docker, ensure that you have Java Runtime Environment (JRE) 21 installed on your system. Follow these steps to set up the server:
-
Download the Server JAR File:
- Obtain the
server.jarfile from the latest release of the project on GitHub.
- Obtain the
-
Set Environment Variables:
-
You can configure the necessary environment variables in two ways:
-
Option 1: Manually export them in your terminal based on your setup. For example:
Adjust these variables according to your specific setup.export MYSQL_HOST=localhost && \ export MYSQL_PORT=3306 && \ ... -
Option 2: Provide a
server.propertiesfile that contains all the required properties. You can download a template for this file from the project's repository and adjust it to suit your configuration.
-
-
-
Run the Server:
- If you chose Option 1 (manually setting environment variables), run the server using the following command:
java -jar server.jar - If you chose Option 2 (using the
server.propertiesfile), run the server with the following command, specifying the location of your configuration file:java -jar server.jar --spring.config.location=classpath:/<path-to-server.properties>
- If you chose Option 1 (manually setting environment variables), run the server using the following command:
Frontend Setup Without Docker
For the frontend, if you're using Android, you can use the provided APK available on GitHub releases or F-Droid. However, for iOS, a standalone app is not available. If you choose not to use Docker for the frontend, follow these steps:
-
Download the Frontend Files:
- Download the
client.tar.gzfile from the latest release of the project on GitHub.
- Download the
-
Uncompress the Files:
- Extract the contents of the
client.tar.gzfile:tar -xzf client.tar.gz
- Extract the contents of the
-
Serve the Files:
- You can serve the frontend files locally using a simple HTTP server. For example, using Python:
python3 -m http.server 3000 - Alternatively, you can serve the files using a web server like Nginx.
- You can serve the frontend files locally using a simple HTTP server. For example, using Python:
By following these instructions, you can deploy both the server and frontend components without relying on Docker. This setup provides flexibility if Docker is not available or desirable in your environment.
Change ports binding
Backend
If you don't want to use the default port 8080, you can do the following:
- change the port binding in the
docker-compose.ymlfile, e.g.9090:8080to setup the port9090for the backend service,
Frontend
If you don't want to use the default port 3000, you can do the following:
- change the port binding in the
docker-compose.ymlfile, e.g.4040:3000to setup the port4040for the frontend service
Complete example
Let's say that you want to run Plant-it on a server with IP http://192.168.1.103 and want to have:
- the backend on port
8089, - the frontend on port
3009.
Then this will be you configuration for the docker-compose.yml file:
name: plant-it
services:
  server:
    image: msdeluise/plant-it-server:latest
    env_file: server.env
    depends_on:
      - db
      - cache
    restart: unless-stopped
    volumes:
      - "./upload-dir:/upload-dir"
      - "./certs:/certificates"
    ports:
      - "8089:8080"
      - "3009:3000"
  db:
    image: mysql:8.0
    restart: always
    env_file: server.env
    volumes:
      - "./db:/var/lib/mysql"
  cache:
    image: redis:7.2.1
    restart: always
server.env file:
#
# DB
#
MYSQL_HOST=db
MYSQL_PORT=3306
MYSQL_USERNAME=root
MYSQL_PSW=root
MYSQL_DATABASE=bootdb
MYSQL_ROOT_PASSWORD=root

#
# JWT
#
JWT_SECRET=32characterscomplicatedsecret
JWT_EXP=1

#
# Server config
#
USERS_LIMIT=2
UPLOAD_DIR=/upload-dir
API_PORT=8080
FLORACODEX_KEY=
ALLOWED_ORIGINS=*

#
# Cache
#
CACHE_TTL=86400
CACHE_HOST=cache
CACHE_PORT=6379
Example of traefik deployment
This is an example of deployment using traefik:
version: '3'
services:
  reverse-proxy:
    image: traefik:v3.0
    command: --api.insecure=true --providers.docker
    ports:
      - "80:80"
      - "8080:8080"
    volumes:
      - /var/run/docker.sock:/var/run/docker.sock

  server:
    image: msdeluise/plant-it-server:latest
    env_file: server.env
    depends_on:
      - db
      - cache
    restart: unless-stopped
    labels:
      - "traefik.enable=true"
      - "traefik.http.routers.app.rule=Host(`plant-it.docker.localhost`)"
      - "traefik.http.routers.app.service=server"
      - "traefik.http.routers.app.entrypoints=http"
      - "traefik.http.services.server.loadbalancer.server.port=3000"

      - "traefik.http.routers.api.rule=Host(`plant-it-api.docker.localhost`)"
      - "traefik.http.routers.api.service=server-api"
      - "traefik.http.routers.api.entrypoints=http"
      - "traefik.http.services.server-api.loadbalancer.server.port=8080"

  db:
    image: mysql:8.0
    restart: always
    env_file: server.env
    volumes:
      - "./db:/var/lib/mysql"
    labels:
      - "traefik.enable=false"

  cache:
    image: redis:7.2.1
    restart: always
    labels:
      - "traefik.enable=false"
Visit http://plant-it.docker.localhost for accessing the app, and http://plant-it-api.docker.localhost/api/swagger-ui/index.html for accessing the Swagger UI.
Use http://plant-it-api.docker.localhost as server URL when request in the app setup.
SMTP Configuration for Email Notifications
An SMTP server can be used to send notifications to users, such as password reset emails. To configure the usage of an SMTP server, the following properties need to be set in the server.env file:
- SMTP_HOST: The host of the SMTP server.
- SMTP_PORT: The port of the SMTP server.
- SMTP_EMAIL: The email address used to send notifications.
- SMTP_PASSWORD: The password of the email account used for authentication.
- SMTP_AUTH: This parameter enables or disables authentication for the SMTP server.
- SMTP_START_TLS: This parameter enables or disables the use of STARTTLS for secure communication with the SMTP server.
- CONTACT_MAIL: contact address to use in the email templates if a user want to contact the administrator
Email credentials
Please note that some providers, such as Gmail, may require the use of an application-specific password for authentication.
Example Gmail Configuration
SMTP_HOST=smtp.gmail.com
SMTP_PORT=587
SMTP_EMAIL=your-email@gmail.com
SMTP_PASSWORD=your-application-password
SMTP_AUTH=true
SMTP_START_TTL=true
CONTACT_MAIL=your-email@gmail.com
Homepage dashboard integration
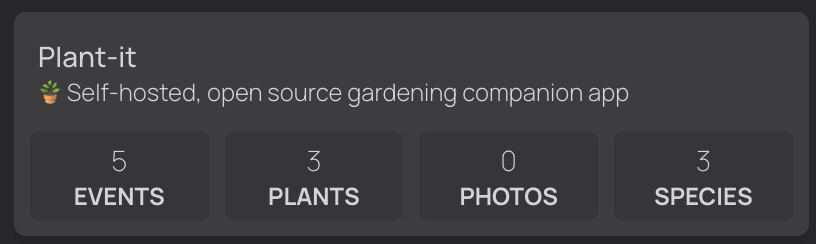
The project offers a widget for integrates the service with the popular dashboard called homepage. In order to use it, simply place the widget as above in the configuration yml file of the dashboard:
- Plant-it:
    href: <server-app-url>
    description: 🪴 Self-hosted, open source gardening companion app
    icon: plant-it
    widget:
      type: plantit
      url: <server-backend-url>
      key: <you-key>
API Key Retrieval
To retrieve an API Key using the REST API, follow these steps:
-
Authenticate and Retrieve JWT Token:
- Send a
POSTrequest to the authentication endpoint to log in. - Replace
<server-url>with the actual server URL. - Example using
curl:
curl -X 'POST' \ 'http://<server-url>/api/authentication/login' \ -H 'accept: */*' \ -H 'Content-Type: application/json' \ -d '{ "username": "user", "password": "user" }'- Upon successful authentication, the response will contain a JWT token. This token is required for the next step.
- Send a
-
Generate API Key:
- With the JWT token, make an authenticated
POSTrequest to the API Key endpoint. You may optionally pass a name parameter for the API key. - Example using
curl:
curl -X 'POST' \ 'http://<server-url>/api/api-key/' \ -H 'accept: */*' \ -H 'Authorization: Bearer <JWT-token>' \ -d '' - With the JWT token, make an authenticated
-
Receive API Key:
- The response from the API Key request will contain your newly generated API Key.
Make sure to store the API Key securely, as it will be used for authenticating your requests to the system.
Kubernetes Deployment
This guide will help you deploy your project using Kubernetes with Minikube. Follow the steps below to set up and access your application.
Prerequisites
- Ensure you have Minikube installed and running.
- Ensure
kubectlis installed and configured to communicate with your Minikube cluster. - (if using Helm) Ensure Helm is installed.
Deployment Steps
Using kubectl
First, download the contents of the deployment/kubernetes directory from the project repository, then:
-
Run Minikube:
minikube start --driver=docker --mount --mount-string="/tmp/plant-it-data:/mnt/data" -
Deploy the DB Secrets:
kubectl apply -f secret.yml -
Deploy the DB ConfigMaps:
kubectl apply -f config.yml -
Deploy the Database:
kubectl apply -f db.yml -
Deploy the Cache:
kubectl apply -f cache.yml -
Deploy the Server:
kubectl apply -f server.yml
If you want to change the configuration values, edit the content of config.yml and secret.yml files.
Using Helm
First, download the contents of the deployment/helm directory from the project repository, then:
-
Run Minikube:
minikube start --driver=docker --mount --mount-string="/tmp/plant-it-data:/mnt/data" -
Create and Modify
my-values.ymlFile: Create a new file calledmy-values.ymlto override the default settings provided in thevalues.ymlfile. You can copy the content fromvalues.ymland modify it according to your configuration needs. This ensures your custom values are applied without altering the default configuration. -
Install the Helm Chart:
This command confirms that the values inhelm install plantit helm --values helm/values.yml -f helm/my-values.ymlhelm/values.ymlwill be used as the base configuration, and any values specified inhelm/my-values.ymlwill override the defaults.
Using TrueCharts
The Plant-it service is also available on TrueCharts, which simplifies the deployment process. You can find the chart for Plant-it here.
Please note that I am not the creator of these charts. For any issues or detailed instructions on how to deploy using TrueCharts, please refer to the official TrueCharts documentation.
Access the Application
Once the deployment is complete, you can access the application and its Swagger UI at the following URLs:
- Application:
http://<minikube_ip>:3000 - Swagger UI:
http://<minikube_ip>:8080/api/swagger-ui/index.html
Replace <minikube_ip> with the IP address returned by the following command:
minikube ip
⚠ Known Issue - Minikube IP not Accessible
If you encounter issues accessing the NodePort service using MinikubeIP:NodePort, execute the following command to expose the service and obtain a direct URL:
minikube service server-service
Then, open the printed links in your browser to access the application and Swagger UI.